 |
 |
 |
SHARPENING
!
THE
CUTTING EDGE
OF
THE
V65
SABRE !
PART ONE I
REVENGE
IS SWEETER
ON
A V65 SABRE !
by
Doug Hathaway
4-15-00
Lets
do something to add to the already awesome power of the 1984 and 1985 Honda
VF 1100s or as we fondly call em " The Sabres"
Oh, Oh here it comes another lesson on how to spend big $$$ !
Not So, Claim I !
Follow
Along my friend, and I'll relate on how I got the
most
for the least that I could afford.
|
|
|
|
Do I Need To Cut Up My Sabre AirBox ?
No,
there is no need to drill holes, cut this ot that.
Your
Sabre airbox can be returned to orginial simply by
taking
the K & N ChargerFilter out and putting the Old one back in.
You
should be able to get one at your favorite Auto
Zone
out
there for around 30 bucks or so.
The
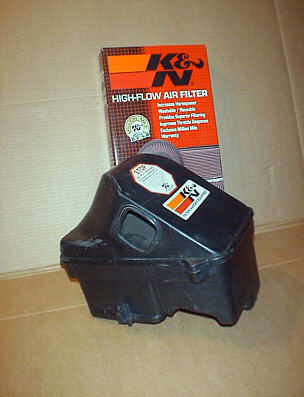
number of the one
in the pictures
NM33-2050 (dimensions 10.00 x 6.812 x 1.062
New
number's
That
may work without to much cutting, if any.
NM33-2534 (dimensions 9.687 x 5.562 x 1.25) inches
But
you are on your own here as I used the one that I could get
that
we had in stock.
If
Auto Zone doesn't have one they can order it in
on
the next regularly scheduled Auto Zone Truck.
Normal
stock truck delivers once a week at most locations.
What do I need to do this?
Here
is what you will need to buy and you can get it all
at
the Auto Zone when you pick up the
filter.
1ea.
K&N
Airfilter/FilterCharger Nr. NM33-2050 AutoZone
Price
$ 33.99
or
1ea.
K&N
AirCharger/Airfilter Nr. NM2534 AutoZone
Price$
unkown at this time.
1ea.
Permatex Black Silicone Adhesive Sealer Nr. SS1768
Price
$ 3.99
1ea.
AutoZone
Nr AZ4 Carburator Cleaner
On Sale Price 2
for
$ 1.68
Do you have to cut the AIRCHARGER down or what?
Yes,
You do! but I just used a sharp pocket
knife to do so.
There
are no modifications made to the airbox, only
to
the airfilter itself.
At this time the NM2534 has not been tried out.
Step # 1
Get
your Airbox out of the V65 -- Down to the two large screws
in
the bottom at that level with the metal screen. It will
come
out in one piece if it is the 1984 V65 with the two air
inlets
on the sides. I don't know about the 1985 airbox with
the
single front air intake. More on this later as I have one
ordered.
Step # 2
Take
it apart and remove the old foam and the two metal
support
frames.
What
I used of those parts were: the top Metal support frame
and
of course both the upper and lower plastic airbox parts,
screws
and the little spooge collection nipple. Then I
cleaned
up the metal frame and the plastic with engine
degreaser
and hot water and a scrub brush. Follow that with
carburetor
cleaner and the brush again. Untill it is
entirely
free of oil and crud inside and out.
Step # 3
Now
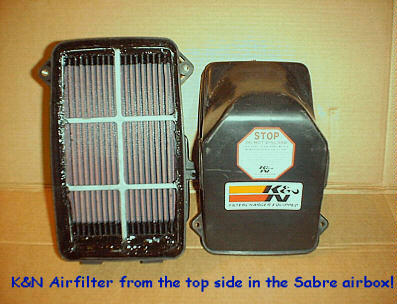
set the plastic aside and using the metal frame as a
pattern
from the top of the filter. You will be able to
visualize
what you must remove, from both long ends...but
remember
that the lower airbox is angled and does not go
straight
down. The secret is to slide the filter to the
rear
after you cut off both ends, but leaving the
main
filter frame intact, and then fill the exposed end
with
the adhesive/sealer when done with all the rest.
Step # 4
If
you have cut the ends off to the main filter frame then
turn
it TOP SIDE DOWN
and place it on a large flat cutting
board
and count in to the second flute (closest to the
cutting
board) and with a sharp knife cut through the second
flute
for the length of the filter and cutting the main
square
filter frame through at both ends. Now do the other
side
and you should be ready to trial fit.
You
will have to bevel the corners a bit. Try not to bend
the
flutes to much.
Do
Not glue the bottom side of the filter in place.
We
don't
want the glue to flake off and go through the metal
screen
and into the engine.
Step # 5
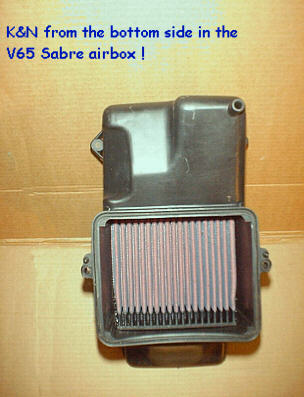
Now
with the filter in the lower airbox with one end resting
on
the angled end, gently press the filter an equal distance
down
all the way around. (It helps to use the Top Metal
Frame
to do this with.) When it is level to your
satisfaction
remove the metal and with the Black
Adhesive/Sealer
flow in a 3/16 fillet all along the top
edges
of filter and actually gluing it to the sides of the
airbox
lower. Making sure that there are no open holes for
the
air to flow around the filter. Now gently press the
metal
frame into the adhesive watching that no large globs
of
the stuff gets on to the working surface of the filter.
When
it is in place to your satisfaction, wet a forefinger
and
smooth the adhesive into a fillet, adding a bit of
adhesive
if needed. Don't worry about the angled end of the
airbox
end where there will be a gap. You can fill that in
about
15 to 20 minutes when the rest of the adhesive has
almost
formed a skin on it.
Step #6
Clean
up and admire your work, when you think that it is
still
wet enough you can add more adhesive to the gaps at
the
angled end and fillet them in to please yourself. When
you
are satisfied that all gaps are filled and that no air
can
leak past the filter then place the Top of the airbox on
the
lower and secure in place with the two locks in front
and
the two screws in the rear. This is so that we can
assure
that we haven't warped the lower case to the point
that
the top will not fit. Okay, now set it aside for
about
16 to 18 hours and let it cure.
All
right here comes the question.....But
Doug, you have
glued
the airfilter into the airbox.
Yes
we have! But if the job is
done
as described the metal frame will set onto its little
stop
ridge and after this adhesive has dried it will be a simple
matter
to just score a line with a pocket knife completely
around
the fillet and with some gentle pressure from the
bottom
side, it will pop loose if you want to take it out.
Though
why you would want to is beyond me. With the K&N
cleaning
kit and reoiler you can do the service work with it
still
inplace in the airbox.
but
off the bike.
Cleaning Your K & N AirCharger!
Spray
on the cleaner from the top side let it set for awhile
and
then back flush with warm water from the bottom. Let it
dry
while you service the rest of the bike and then respray
with
the oil from the kit and put it back on the bike an go
ride.
END PART ONE !